| project name: | ekombi |
| project url: | https://github.com/tlubke/ekombi |
| author: | tyler |
| description: | polyrhythmic sequencer/sampler using ack |
| discussion url: | https://llllllll.co/t/ekombi/26812 |
| tags: | sequencer midi grid |
ekombi v2.0
polyrhythmic sequencer
Requirements
norns, grid, MIDI (optional), crow (optional)
Demo
(Click to watch video on Vimeo)
Tutorial
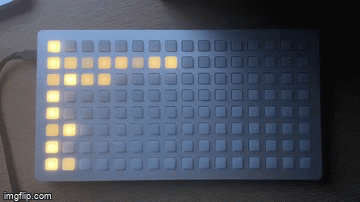
When you launch ekombi for the first time, you should see something like this…

Take a look at the first two rows. These two rows together represent a track inside a pattern. The 4 lit keys in the second row each represent a beat, and the singular lit key in the row above it represents the subdivisions of the current beat (indicated by being brighter than the rest during playback).
Try loading a sample into the first track through the parameter menu, and you’ll hear it play everytime the light in the second row changes. After you reaching the fourth beat, you’ll notice the beats wrap around to the beginning. Each track in ekombi can be independent from each the others in the length of its beats.
Now, let’s make it a little more interesting and change up the subdivisions in the first track.
Tap the first beat.
The playback stops anytime you edit the pattern in some way.
Now tap another beat.
Short taps in the beat row set the active beat to whichever one is pressed, displaying the corresponding subdivisions in the row above.
Tap back on the first beat, then find the third key in the subdivision row (row above) and hold it down for about a half-second before releasing.
Now your grid should look like this.

When you resume playback, the first beat will play triplets! To turn the sequencer back on, hit key 3 on norns. The pause/play icon on the screen will change, and anytime playback is started, the pattern resets. This means that all of the beats start at position 1.
Triplets are nice, but what if you didn’t want to hear all 3 of them? Tap the first beat again. Playback will stop and you’ll see the triplets in the row above. When you’re editing beats like this, a short tap to a subdivision will toggle it on/off (indicated by a drastic change in led intensity). Before you play again, try tapping on some different beats and setting their subdivisions.
What if 4 beats isn’t enough (I’m a 5-beat-guy myself)? Well, just like changing the number of subdivisions, holding and releasing the n-th key on a beat row will change the number of beats to n. For both beats and subdivisions, this works to make it shorter as well. Note that changing the number of beats from some number to a lesser number will cause you to lose some data. For example, changing from 6 to 4 will cause you to lose any subdivision changes in beats 5 and 6 if you ever decide to change back from 4 to 6.
I’m sure by now you’ve made something you might want to use later. In the parameter menu there are options to save, clear, or duplicate your current pattern. If you’ve saved more than 1, you can even delete them. Note that duplicating only duplicates the saved state of the current pattern. So, if you were to duplicate your current pattern, it would copy the intial state, since you haven’t saved yet.
Try going to the parameter menu now and saving your pattern.
After you save it, duplicate it, then exit the parameter menu.
Notice the number in the top-left corner of the screen changed. It went from 01/01 to 02/02. This represents the currently viewed pattern out of all saved patterns. Use enc 1 to navigate through your saved patterns. Note that changes will be lost when you navigate to a different pattern. Auto-saving is planned for the near future, but is not implemented yet.
Now, with the second pattern still viewed, go back to the parameter menu and clear the pattern.
Close the parameter menu, and you’ll see that the pattern looks like how you first started. 4 beats and 1 subdivision in each track.
This will make demonstrating the next features, group-editing and step-parameters, much easier.
Hold down key 2 (Shift) on norns and tap a beat in the first row. Pressing a beat or subdivision key when holding shift adds it to the edit-group. Behavior is different depending on if you are group editing beats or subdivisions, for now you’ll focus on the beat behavior.
After tapping a beat you should see its led intensity set to max, and the norns screen display a different parameter menu. In the beat parameter menu, there are options like “on”, and “steps per beat”, but you’ll get to that later.
Tapping the same key removes it from the edit-group, and tapping it again will add it back.
Go ahead and add one other beat to the edit-group.
As long as the number of subdivisions and their on/off states are the shared across all of the beats in the edit-group, you should be able to toggle the same subdivision in all the selected beats at once.
Toggle the subdivision off for the 2 beats you selected.
Now, press key 2 again to leave group-editing.
This time, hold Shift (key 2) and tap all of the beats. As soon as you add a beat without identical subdivisions, the subdivision row turns blank.
Set the length of subdivisions for all the beats with a held press. This overwrites the subdivisions for all the beats, and now that they’re all identical, they can be edited quickly. Note, setting the length of all the subdivisions still works even the subdivisions are identical.
Before you stop editing this group, take a look at the beat’s parameter menu that came up on the norns screen. These are parameters specific to the beat. Switching the notes to “off” will cause beats to not be triggered, the leds will also be noticeably dimmer when set to off.
Steps per beat sets the number of clock beats that go into the relevant beat. If a beat has 3 subdivisions, and steps per beat is changed from 1 to 2, then what might be considered eigth-note-triplets become quarter-note-triplets.
Next, you’ll learn about group editing with subdivisions. After exiting from the beat parameter menu, hold Shift and this time press a subdivision somewhere. You’ll notice the menu is filled with engine parameters this time. This allows you to change the sound at each step. What happens when you press a beat in this case? It lets you look into other beats and add more subdivisions to the edit-group.
That should be enough to get you started!