
| project name: | awed |
| project url: | https://github.com/melocoi/_awed |
| author: | ululo |
| description: | harmonic series aggregator |
| discussion url: | https://llllllll.co/t/awed/72603 |
| documentation url: | https://github.com/melocoi/_awed/blob/main/README.md |
| tags: | drone harmonics engine grid |
_awed
a harmonic series aggregator
for norns w/grid
 </img>
and some additional videos to be found here _awed DEMO vids
here are some of the key combos that are not in the video, but may be helpful
-
K1 + Enc 2 = main buffer Record amplitude
[ indicated on screen by the bg square color ]
will effect how loud the harmonics will be recorded to the buffer.
-
K1 + Enc 3 = buffer Preserve amplitude
[ indicated on screen by the size of the circle ]
will efffect how long the decay of the delay is
-
K1 + Enc 1 = main buffer Amplitude
[ indicated on screen by the color inside the circle ]
control the overall volume of the recorded buffers
the following allows for quick controls over the buffer length, ( performed in video around 8:06 )
-
K2 = set Loop start
-
K3 = set Loop end
-
K2 (long press > 1 sec) = clears loop length and restores default length set in params menu
-
K3 (long press > 1 sec) = clear loop contents, total erasure
for quick reference here are some controls mentioned in the video
-
Enc 1 = buffer playback rate
[ indicated on screen by the size of the bg square ]
the rate is quantized to the scale selected for the synth, set in the params menu. Can also adjust the rate slew.
-
Enc 2 = synth filter Q factor
[ indicated on screen by thickness of randomly drawn lines ]
defaults to max value (highets Q factor) turn CW to reduce Q factor
-
Enc 3 = softcut filter cutoff frequency of main buffer
[ indicated on screen by the thickness of the circles border ]
This filter is quantized to the scale selected for the synth, set in the params menu. This means you will get stepped filter sweeps. Which is an effect I enjoy.
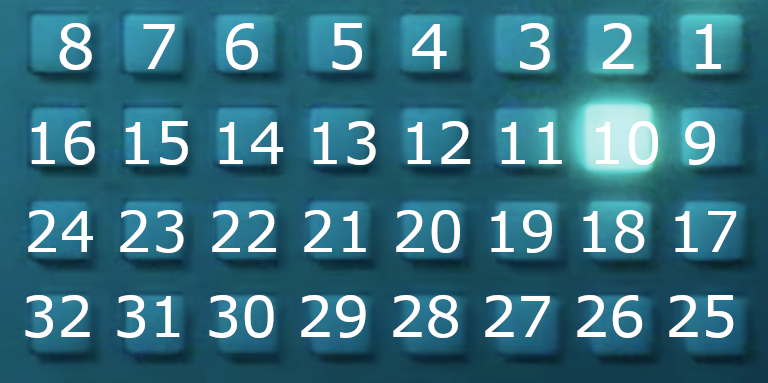
Here is a map of the grid layout
 </img>
Now some info on the different parts of the script…
The script comprises 2 major sections. the Synth and the Tape loop.
………………………………………………………………………
………………………………………………………………………
………………………………………………………………………
the Synth
The synth engine is based on a band pass filtered saw wave.
There are two modes available. Percussion mode and Long Tone mode. Selected by the PERC/LONG TOGGLE (displayed above).
Control of the synth is available by using the grid sections ENVELOPE GRID, HARMONICS, and ROOT NOTE (displayed above). As well as a filter resonance control using Enc 2.
The premises of this synth and the way to make sounds and pitches is intimately related to the harmonic series. An understanding of which, while not required, can open up some of the possibilities and limitations that are present in this interface. The most basic thing to understand is how a harmonic is a multiple of a root pitch.
So, the 12th harmonic of a pitch of C2 (65.41Hz) is 784.92Hz (65.41 * 12). You may, or may not, realize that this pitch is not a ‘real’ note in the equal tempered scale, you can’t find this on a piano. But it is a real pitch, and these are the kinds of tones that we get to explore with this interface.
With this in mind, when playing this synth, we select our pitch, or pitches, through a combination of the ROOT NOTE section, and the HARMONICS section. It is possible to have more than one harmonic selected. But only one root note can be selected. Every time we launch a synth, by pressing one of the ENVELOPE GRID keys, it will randomly pick a harmonic that is activated and multiply it by the root note that is selected.
synth(FREQ) = (ROOT NOTE) * (random(HARMONIC))
 </img>
root note
</img>
root note
 </img>
harmonics
</img>
harmonics
TUNING
_awed has a tuning system that allows you to set the ROOT FREQ directly, entering a number in Hz, or by selecting a ROOT NAME, such as C2 or E3. You also have two modes of temperament, JUST INTONATION and EQUAL TEMPERAMENT. You can refer to other resources for more information on this topic, it is quite a deep rabbit hole, and utterly fascinating. However, for a more immediate and functional understanding, if you want to be in tune with a “traditional” synth, or a piano, or guitar, stick to the ET mode and choosing a ROOT NAME. To be more adventorous, Choose your ROOT FREQ directly and set it to JI.
You can further customize the ‘flavor’ of Just Intonation by going into _awed.lua directly, using Maiden, and editing the justI table. it looks like this…
-- to change your flavor of Just Intonation
-- Comment and Uncomment the lines to select which JI intervals you want.
-- Or make your own!!!
-------------------------------------------------------------------------------------------------------------
justI = { 1/1, 16/15, 9/8, 6/5, 5/4, 4/3, 45/32, 3/2, 8/5, 5/3, 16/9, 15/8 } -- "normal"
--justI = { 1/1, 16/15, 9/8, 6/5, 5/4, 4/3, 45/32, 3/2, 8/5, 5/3, 9/5, 15/8 } --"Ptolemy"
--justI = { 1/1, 17/16, 9/8, 19/16, 5/4, 21/16, 11/8, 3/2, 13/8, 27/16, 7/4, 15/8 } --"overtone"
--justI = { 1/1, 16/15, 8/7, 32/27, 16/13, 4/3, 16/11, 32/21, 8/5, 32/19, 16/9, 32/17 } -- "undertone"
The final step to the tuning process is to choose your SCALE. At this point you will be ready to play all the notes you could ever dream of, and then some.
PLAYING
Once you have your tuning worked out, a ROOT NOTE selected, and some HARMONCS picked out, it is now time to play. This is accomplished by using the keys in the ENVELOPE GRID section.
Each key in this section will launch a synth with an envelope related to the key that is pressed. Basically, envelopes are shortest to longest from right to left and top to bottom.
The formula for the envelope is in the code… (line 828 of _awed.lua)
  engine.atk(x+y)
  engine.rel(x*y)
  engine.sus(x/2)
This is in seconds, so the shortest envelope possible is at grid 1,1 (which is the top right corner of the grid) and it will be 3.5 seconds long.
atk(1+1) + rls(1*1) + sus(1/2) = 2 + 1 + 0.5 = 3.5
From this we can see that the envelope is more or less symetrical on the top row of the grid, and as we move down the grid (which will increase the y value) we quickly begin to significantly increase the release stage of the envelope. The bottom left grid key (8,8) would have the following envelope
atk(8+8) + rls(8*8) + sus(8/2) = 16 + 64 + 4 = 84 seconds long
and the bottom right grid key (1,8) would be
atk(1+8) + rls(1*8) + sus(1/2) = 9 + 8 + 0.5 = 17.5 seconds long
for completionists sake, the top left grid key (8,1)
atk(8+1) + rls(8*1) + sus (8/2) = 9 + 8 + 4 = 21 seconds long
One thing that may be confusing about the interface is the way the lights are indicating the volume envelope. Because the lights reduce in brightness and go dark before brightening up again, which can give the visual impression that the envelope is repeating itself. This is not the case. The audio envelope cycles once. However, visually, the key will change in brightness every second and cycle through from brightest to darkest until the envelope completes.
You are free to launch as many synths as you would like, although it is possible to overload the CPU of your Norns if too many synths are playing. This can be heard as a crackling sound. You can also keep track of CPU load by looking at the Norns menu screen. I deliberately chose not to limit the amounts of synths that are launchable because this is a musical instrument that the player needs to learn and become familiar with the limits, so they may be able to push them when they so choose.
FILTER
ENC2 allows you to adjust the filtering applied to the saw wave. It’s default setting is the highest Q factor and produces, essentially, a sine wave. Turning clockwise will open up the filter to allow the full harmomnic spectrum of the saw wave through. This is indicated on screen by the randomly drawn lines getting thicker or thinner based on how open or closed the filter is.
PEC/LONG TONE
There are two distinct modes available. PERC, or percussion, and LONG TONE.
The LONG TONE mode is indicated when the grid key is illuminated. In this mode the synth sounds like you would expect with a traditional synth, providing long sustained tones.
In PERC mode things are a little different. When lauching a synth, we are greeted with a regular series of short envelopes triggered at a constant tempo. At least this is what it sounds like. In fact, what is happening is that the synth is playing back at such a low frequency the sound is perceived as a series of clicks. With the filtering applied, the clicks can be shaped into what sounds kind of like a Marimba, in a pinged filter sort of way. Or it can be raw noisy clicks with the filter open.
The rhythms are effectd by which envelope key you press.
The formula is as follows found at line 820 of _awed.lua
mults[y]*(x*x)
This formula is based on a table called “mults” which is defined as mults = {1, 1/2, 1/3, 1/4, 1/5, 1/6, 1/7, 1/8}
For an example, pressing key 5,3 (which is 5 down and 3 from the left) would provide the following tempo of clicks…
mults[3] = 1/3
(1/3) * (5 * 5) = 8.333…Hz or 498 BPM
key 8,8 (the top left key) would give us the following
mults[8] = 1/8
(1/8) * (1 * 1) = 0.125Hz or 7.5 BPM
PANNING
In the most recent update a few parameters have been added to the Synth Engine section. These are Drift Speed, Drift Spread, and Drift Wrap. Which will effect the way that the stereo image is generated and manipulated. Currently, and previously, each time a synth is launched, a stereo position is randomly determined for it. And it remained static throughout the life of the synth. Now, with the new controls, you are able to add some motion to the stereo placement of the synth. Creating an even more dynamic stereo field. The origin of the sound is still randomly determined, but how it behaves after creation is now adjustable.
The first parameter is DRIFT SPEED. This is the rate at which the sound will move in the stereo field.
The second parameter is DRIFT SPREAD. This is the distance from the origin that the sound will travel. A value of 1 will ensure that the sound will travel across the full stereo field.
Finally we have DRIFT WRAP. By default this is set to 0, or off, when set to 1, or on, you will hear sounds that reach the extremeties of the stero field wrap over to the opposite side. In actuality it is more of a hop, when in long tone this is more obvious as there will be a sudden pop as it travels. Which adds some percussivity to the drones.
These new parameters provide quite a bit of new sonic territory to explore, not just with an increased undulation of tones across the stereo field, but when we increase the DRIFT SPEED into higher frequencies, vibrato/tremolo/esque effects can be acheived. Even higher rates introduce a kind of distortive quality, a bit like an FM synthesis, only here it would be PM, which has really made me smile with some of the results.
………………………………………………………………………
………………………………………………………………………
………………………………………………………………………
the TAPE LOOP
_awed is listening to and recording everything, by default, to a stereo softcut buffer. From the engine, but also, form the audio inputs!
The default length of this buffer is 22 seconds long, which means whatever you played right now, you will hear again in 22 seconds. Also by default is a decay that will cause the echoes to slowly fade into nothingness over time. This loop is played back at a normal rate, which means you will hear it the same way you played it. For the most part. There is a built in tape wobble, a slow changing and low amplitude adjustment to the rate of playback, just enough to encourage beating tones. Not enough to completely detune the sounds.
There are controls for the amount of sound that is preserved, recorded, or heard from this main buffer, listed at the top, but here again…
-
K1 + Enc 2 = main buffer Record amplitude
[ indicated on screen by the bg square color ]
will effect how loud the harmonics will be recorded to the buffer.
-
K1 + Enc 3 = buffer Preserve amplitude
[ indicated on screen by the size of the circle ]
will efffect how long the decay of the delay is
-
K1 + Enc 1 = main buffer Amplitude
[ indicated on screen by the color inside the circle ]
control the overall volume of the recorded buffers
There are also several ways to control the rate of playback/pitch of the buffer. The first and most obvious is with Encoder 1…
-
Enc 1 = buffer playback rate
[ indicated on screen by the size of the bg square ]
the rate is quantized to the scale selected for the synth, set in the params menu. Can also adjust the rate slew.
The parameters menu has a rate slew variable that will allow you to change the amount of time it takes for the rate changes to take effect. The default is 12 seconds. Keep in mine that the rate slew is also used by the tape wobble, so if you lower it to zero, you may hear steppy glitches as the tape periodically changes speed. This could be intentional.
Another way in which the overall rate of the buffer can be manipulated is by doing a long press on a ROOT NOTE grid key. Which will then change the root rate of the buffer to the selection.
Changes to the rate of the tape buffer will have an effect on the new material being recorded to it. If the rate is changing while a constant tone is being recorded, on playback it will sound like a glissando up or down instead of a constant pitch.
There are also ways to change the total duration of the tape loop. In the parameters menu you can increase the total length of the loop. As well as define a start and end point within the total length.
The start and end point are also settable from the panel with the following …
-
K2 = set Loop start
-
K3 = set Loop end
-
K2 (long press > 1 sec) = clears loop length and restores default length set in params menu
-
K3 (long press > 1 sec) = clear loop contents, total erasure
MUTATOR
The MUTATOR has several parameters to help control/sculpt their activity but are mostly autonomous agents of change. The parmeters are…
REST percentage, the chance a mutator will not sound. REVERSE percentage, the chance the mutator will play in reverse. AMPLITUDE , the loudest level for the mutator.
Within these parameters a mutator will play content from some point in the buffer, for some duration of time.
These are mono play heads that will playback material from one of the left or right stereo buffers at a pitch ratio that is selected from the MUTATOR grid key rows, found just above the ROOT Note selection row.
DISCOMBOBULATOR
the final method for manipulating the buffer is the Discombobulator. A mechanism that will rearrange or erase the contents of the buffer.
This is engaged by the row above the Mutators.
From right to left you have the ability to select the chance of discombobulation. Which is essential a 1 in 8 chance, 2 in 8, 3 in, 8 etc.
In the parmeters menu you will find ways to adjust the TIME and AMPLITUDE.
The TIME determines how big the chunk of time that gets discombobulated could be.
The AMPLITUDE is how much, or little, of the signal is preserved in the discombobulation.
There is very little control over this part. There is also the potential for feedback when the AMPLITUDE is high. and the TIME is long. This has the potential to be desirable or undesirable. I find that in practice, for me, less is more. It is something to be done occaisionally to introduce glitches. Or as a way to erase everything.
………………………………………………………………………
………………………………………………………………………
………………………………………………………………………
the End????
…is it? I’ve only just begun exploring the possibilities that are already here. I am starting to post a few more demo videos that can be found here…
As others play along I would love to help them realize their own goals with this instrument.
As for my own goals, I’m taking this engine a step further and buildig a laptop version, which is where this all started, that is to be used for multichannel sound deployments. I have a failry simple system of bluetooth speakers that I can deploy anywhere to have a portable ambisonic performance setup. Imagine parks, trails, alleys, and squares, as venues and you may start to get the idea. And of course, I would be happy to share details and code as they develop.
Thank you so much for your time and interest.
- Darren “ululo” Russell